
What is the Course Creator?
Ever wanted to create your own online course for an audience, but didn’t know where to start?
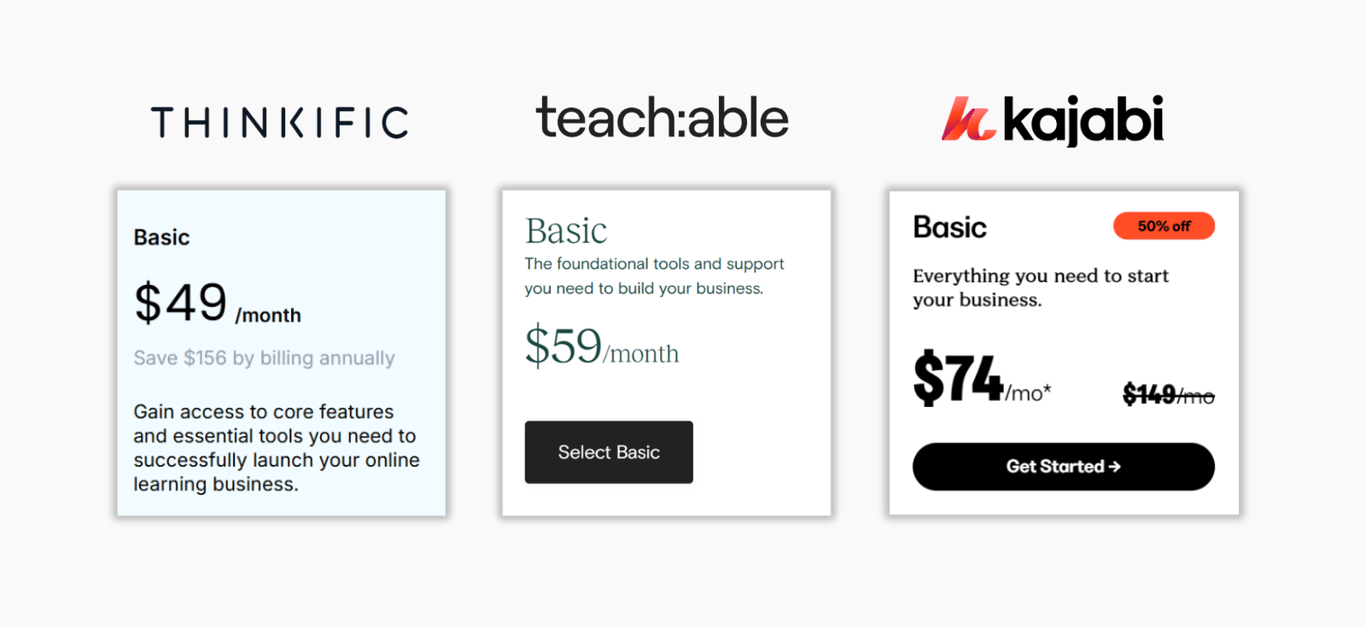
Perhaps you've even taken a step further—doing a quick Google search about launching a course and discovering platforms like Kajabi or Teachable.
A quick look at their pricing shows these platforms can cost $60 or more per month!
Yeah right.
Like many others interested in creating a course, you need something lightweight and user-friendly that you can start using right away—without spending a fortune.
I’ve built exactly that inside a Notion template.
… the Course Creator.
The Course Creator is a modular course builder in Notion that lets you build a structured framework for your course in minutes (literally).
Here’s what you get:
- Create course sections, modules, & lessons with a click of a button.
- Builds beautiful, user-friendly course layouts.
- Use with beginner-level Notion knowledge.
- Distribute easily to students at no extra cost.
How does the Course Creator work?
Course Creation begins with making a lesson plan.
What do you want to share with your audience?
After a lesson plan is made, you start with a Course Template which you will use to build your course.
With its simple interface and intuitive buttons, you can quickly create your course's sections, modules, and lessons.
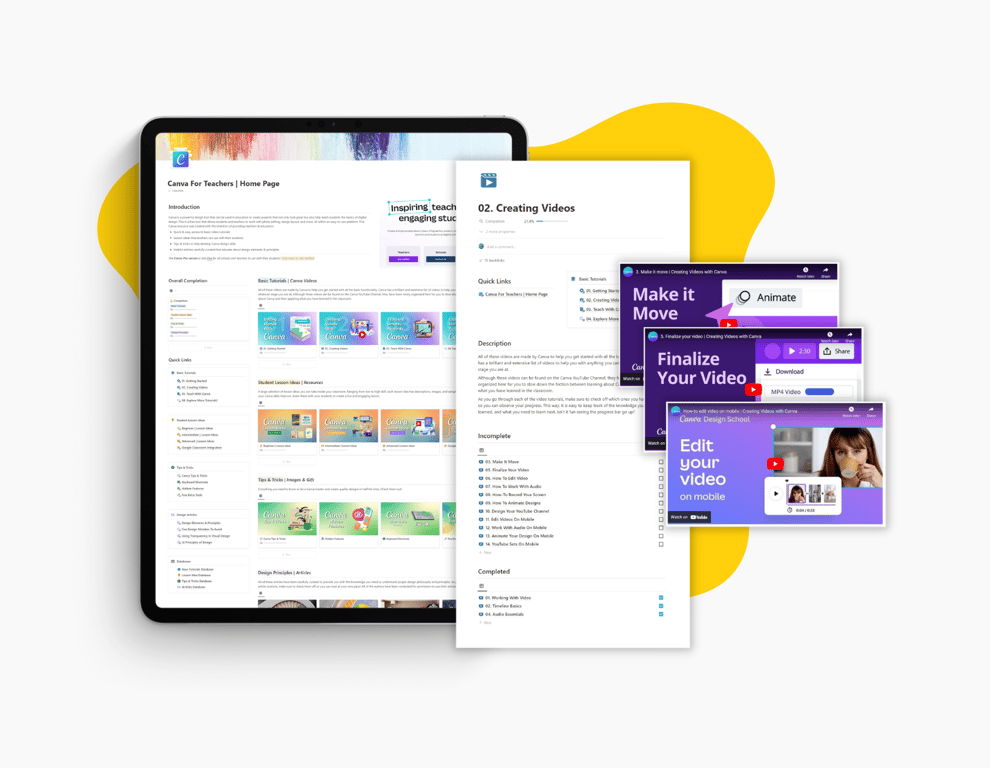
[VIDEO DEMONSTRATION]
After finalizing the layout and initial structure using the builder, add your knowledge, resources, and lesson content.
Finally, add your custom covers for a polished finish—and you're done!
The only thing left is to share it with your audience.
Easy, right?
Creating Your First Course
Step 1: Plan your Course
The Course Creator uses a simple 3-tier structure:
- Sections: The biggest blocks of your course.
- Think of them as major topics or themes (like "Getting Started" or "Advanced Skills").
- Modules: Groups of related lessons within a section.
- They help organize your content into focused learning units.
- Lessons: Your actual teaching content.
- These are the individual videos, readings, or activities your students will complete.
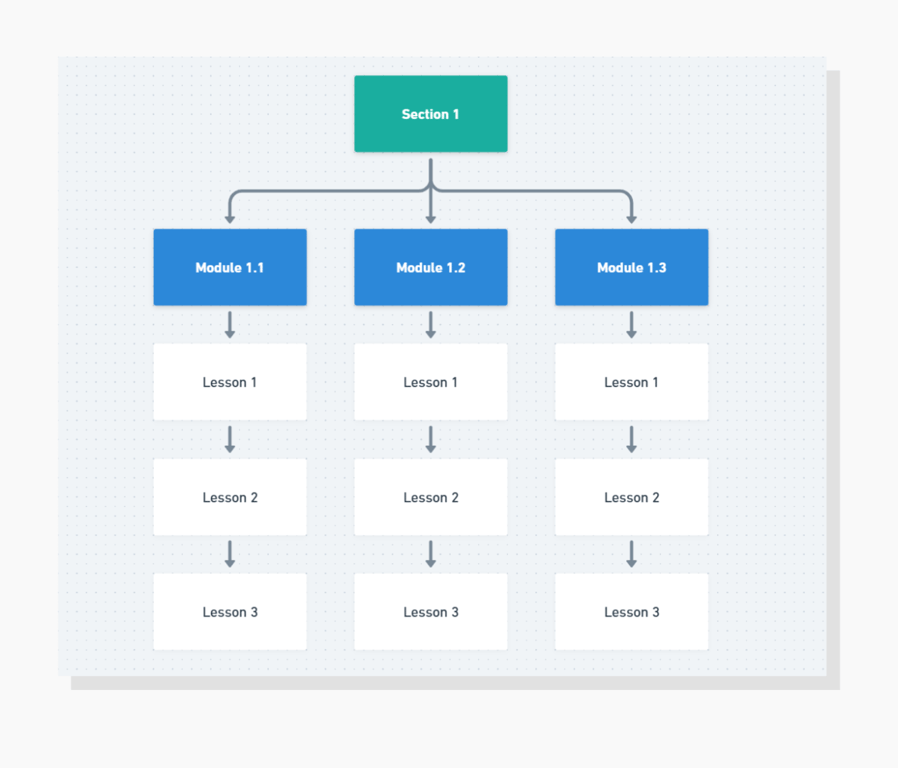
That's it! Plan your course content around these three building blocks and you'll have a clear, organized structure for your students.
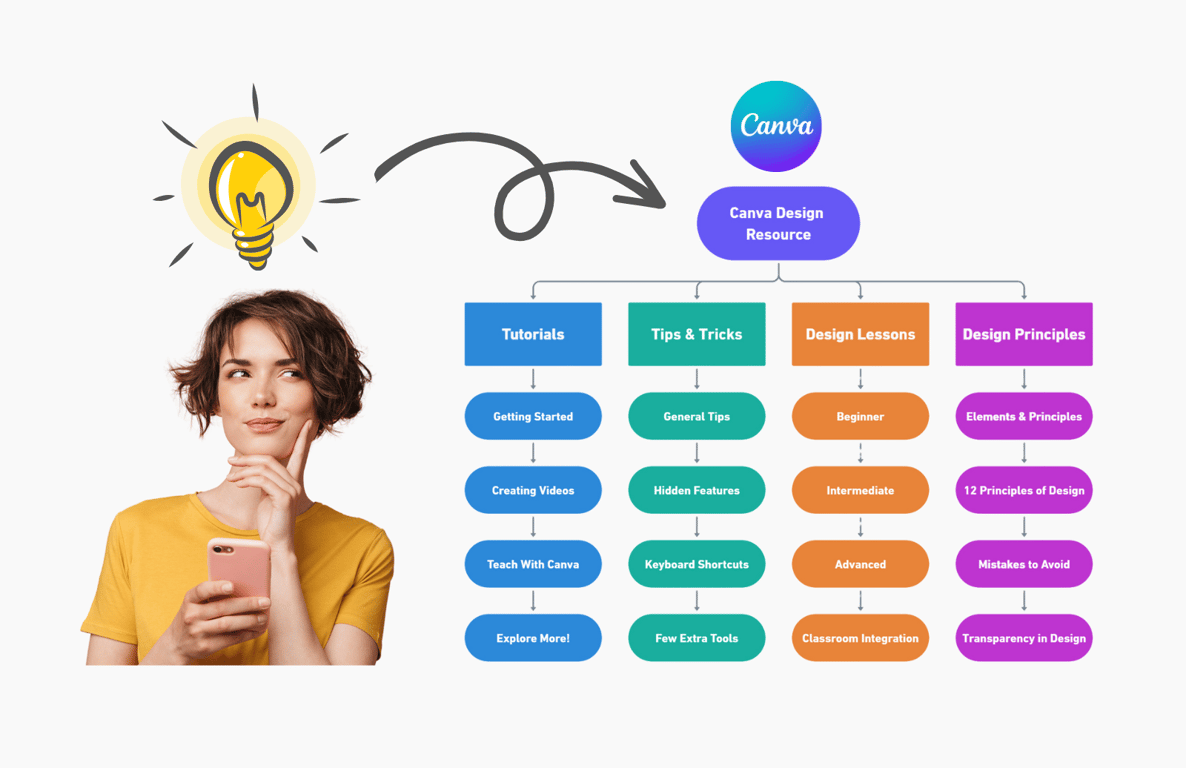
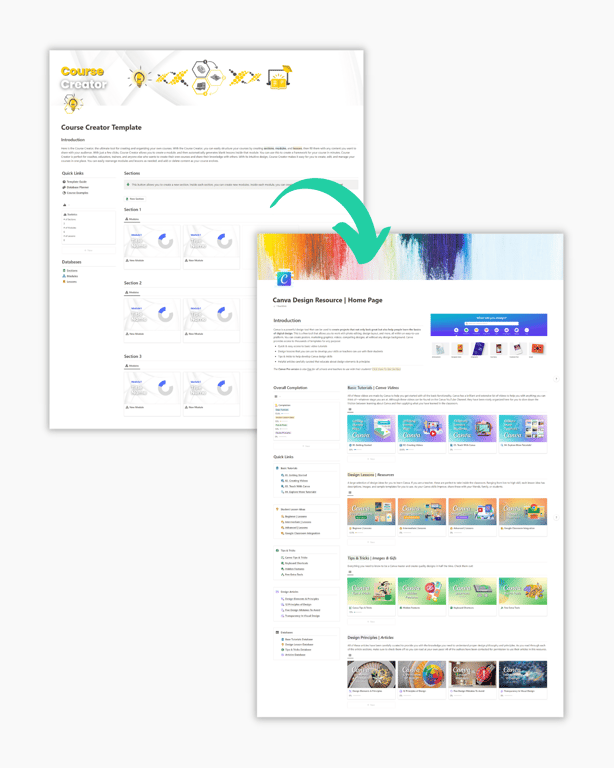
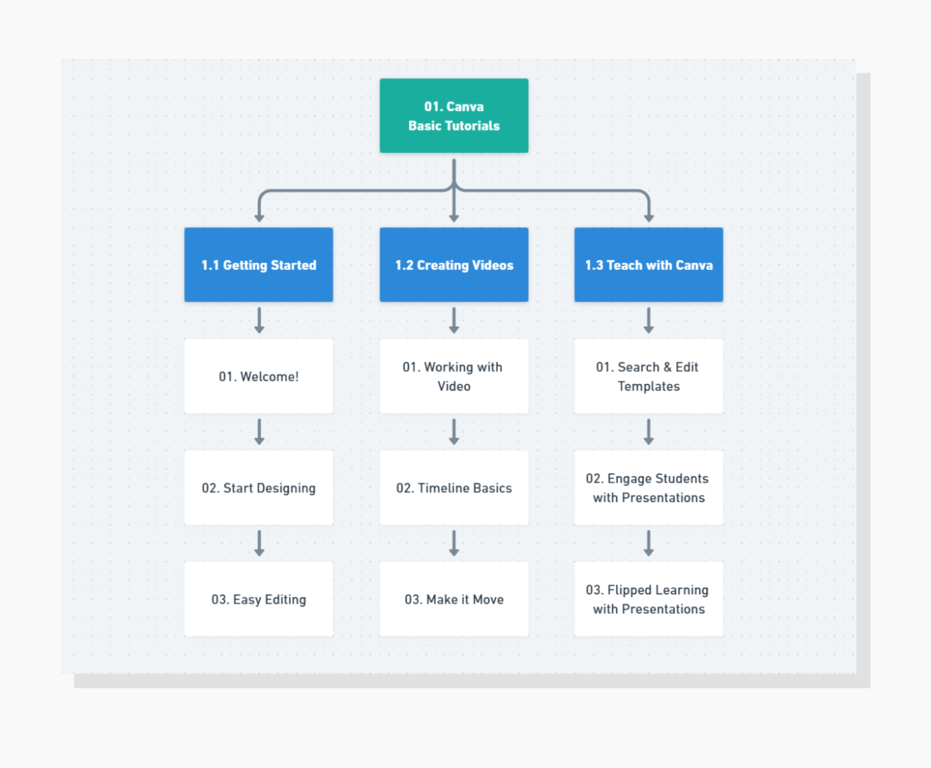
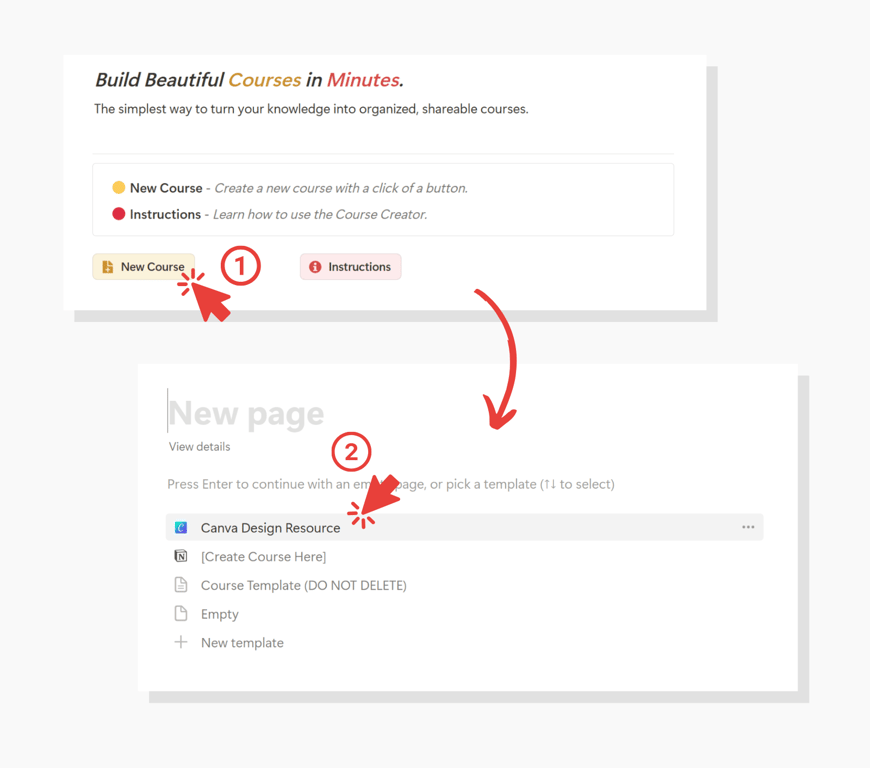
Here’s an example of the Canva Design Resource lesson plan (1 section):
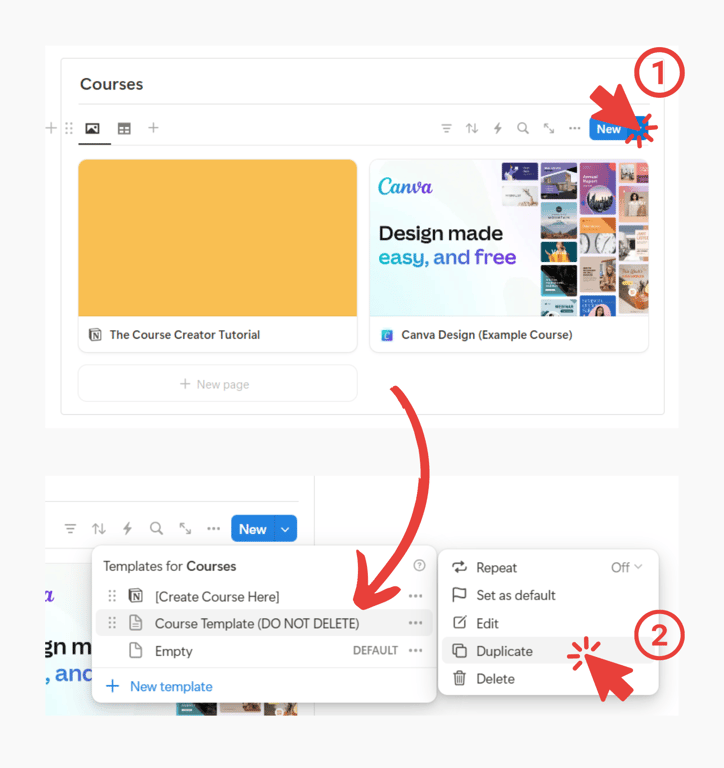
Step 2: Duplicate & Edit a Template
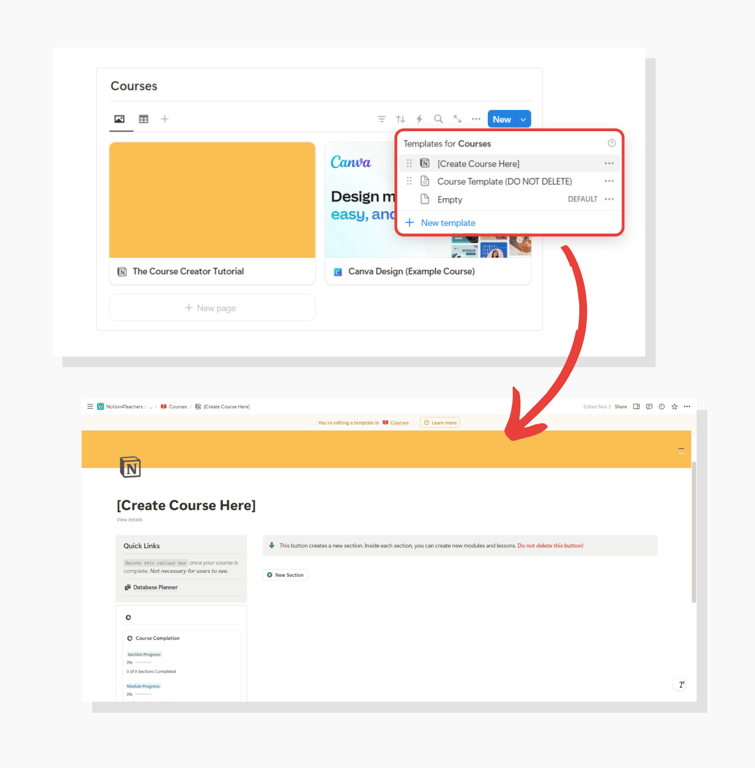
After you’ve made your lesson plan, the next step is to duplicate the base template titled Course Template (DO NOT DELETE) and edit the duplicated version of this template.
If this is your first course, you can begin by editing the [Create Course Here] template as this duplication has already once been done for you.
Editing the template this way makes it easy to share the course with all your students while allowing you to create multiple courses.
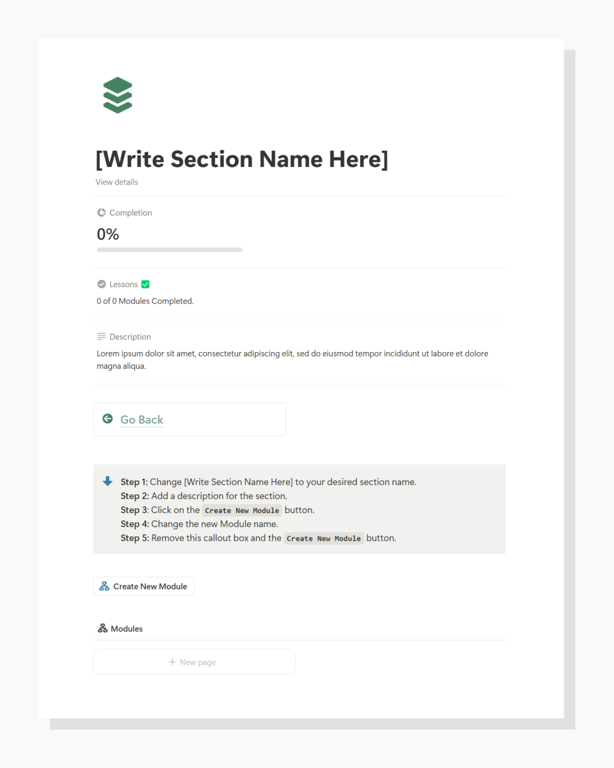
Step 3: Create a Section
Begin by creating your first section. This is done by clicking the
New Section button.Clicking this button does two things:
- Creates a block above the button with a view of modules and a title.
- This is how the Section is viewed on the main page.
- Creates a new section in the Sections Database.
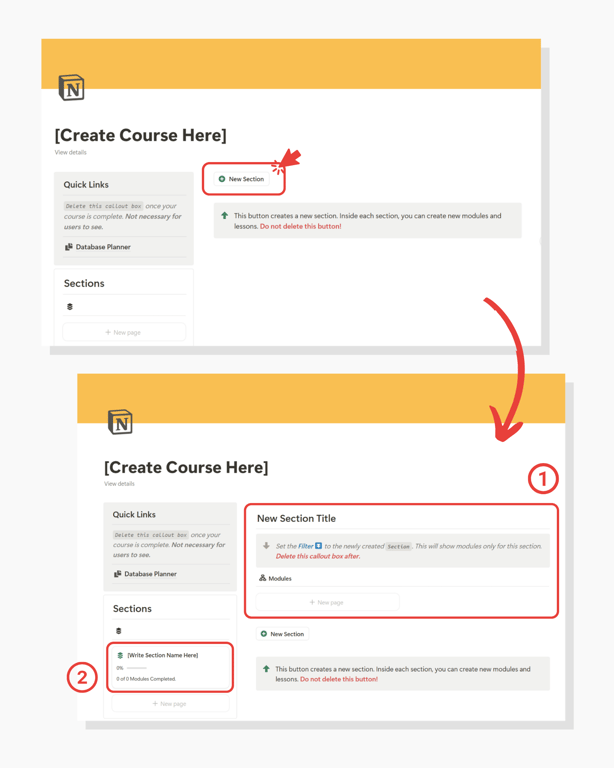
- After clicking the button, a section page will pop into view.
- Give your section a name and a description.
- This page is where we can add modules to the section.
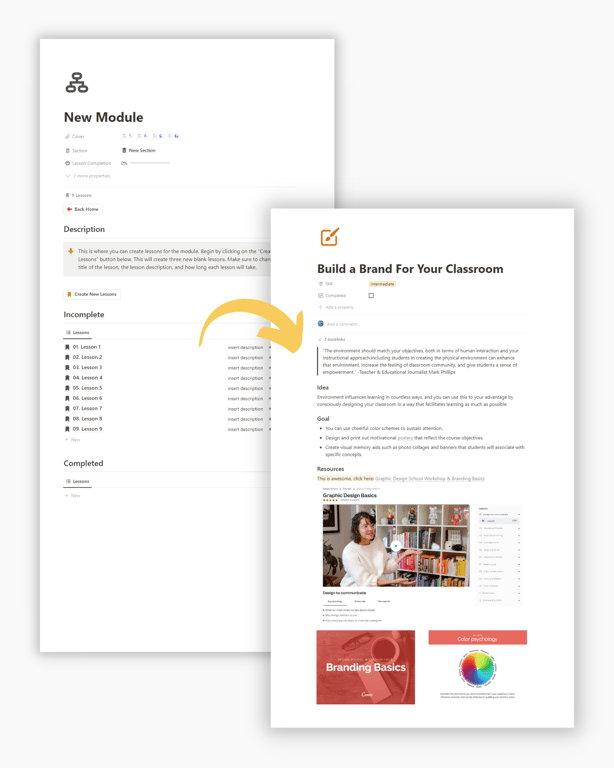
Step 4: Create a Module
After completing the section title and description, you can begin creating your modules.
Click the
Create New Module on the section page.You may also follow the instructions in the callout box.
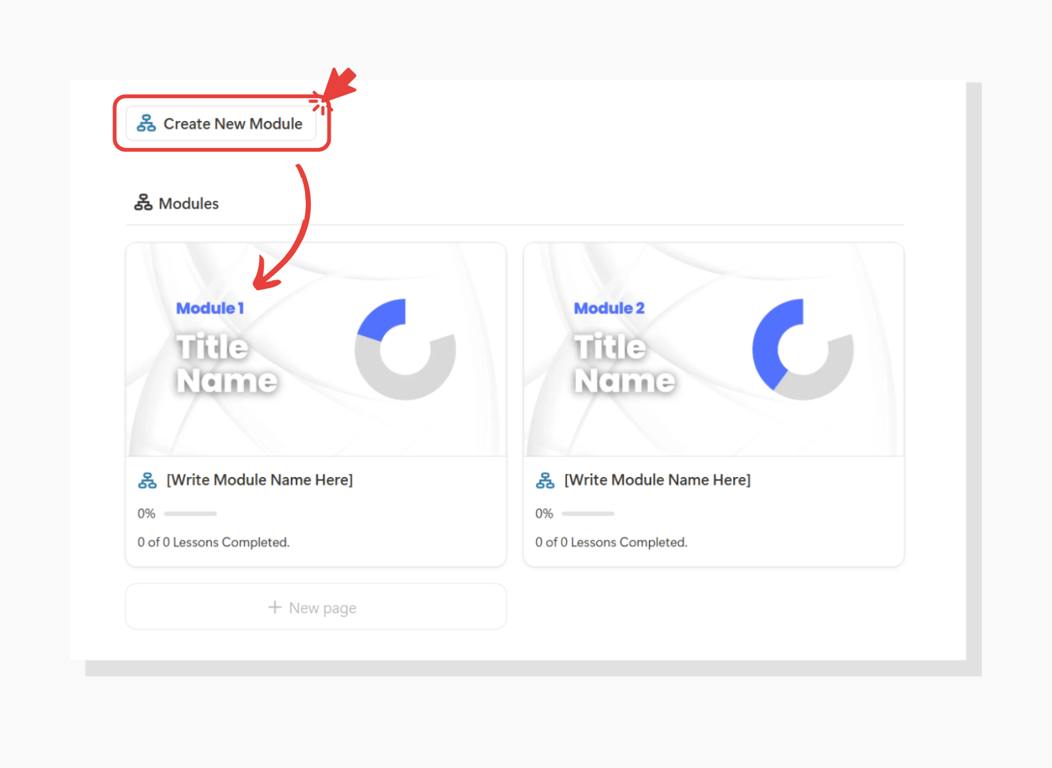
Important! Make sure to change the section name and filter on the course home page as per the instructions. This will make sure the correct modules show under the section title.

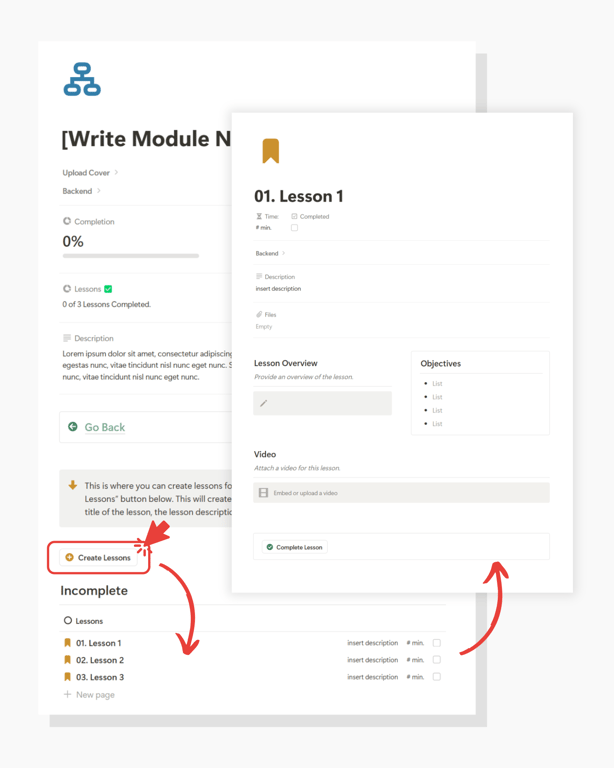
Step 5: Create Lessons
On the Module page(s), click the
Create Lessons button to create three (3) empty lessons.When you open a lesson, you can add videos, text guides, downloadable files, and other resources.
Step 6: Adding your Knowledge / Resources
Now you can begin by adding your lesson knowledge and resources.
Here's how to get started:
- First, write descriptions for all your sections, modules, and lessons.
- Second, populate your lessons with knowledge and resources.
- Third, pretend you are a student and go through your course lesson by lesson. Does it all make sense?
Step 7: Make it Beautiful
The final step is making your course visually appealing for your students. You can add custom covers to your sections, modules, and lessons to achieve this.
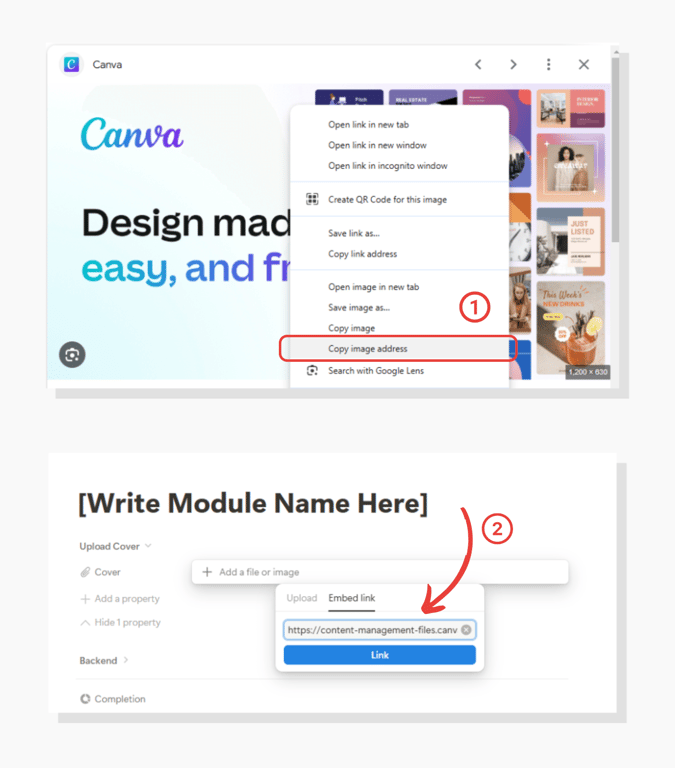
Approach 1: Create Covers using a design tool (Canva, Figma, etc.) and upload.
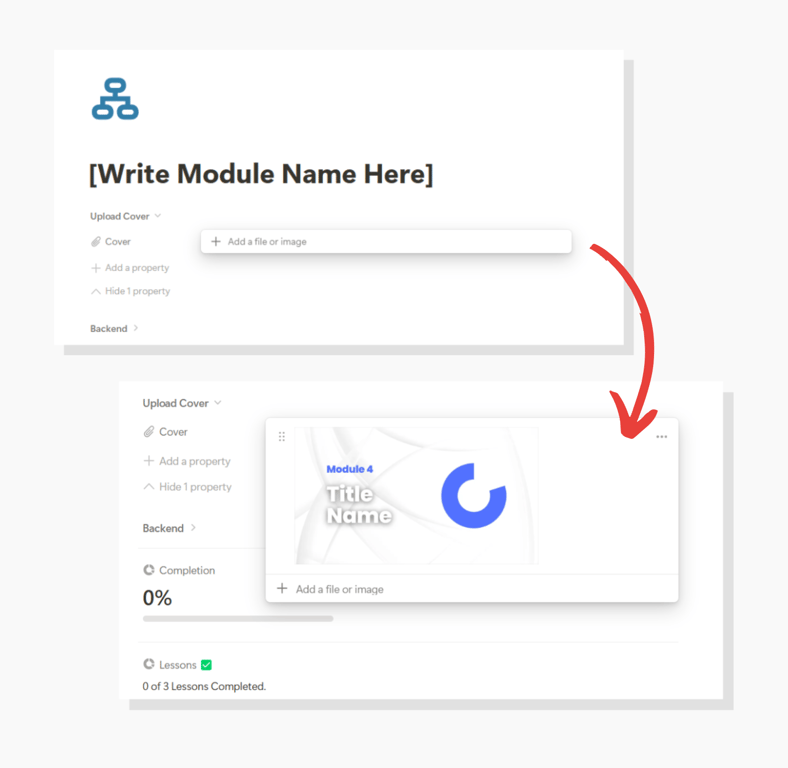
Approach 2: Import Google images using a web image link.
That’s it! Now it’s time to share.
Sharing Your Course with Others
Now it’s time to share your course with your audience.
Go back to the main Course Creator page and follow these steps:
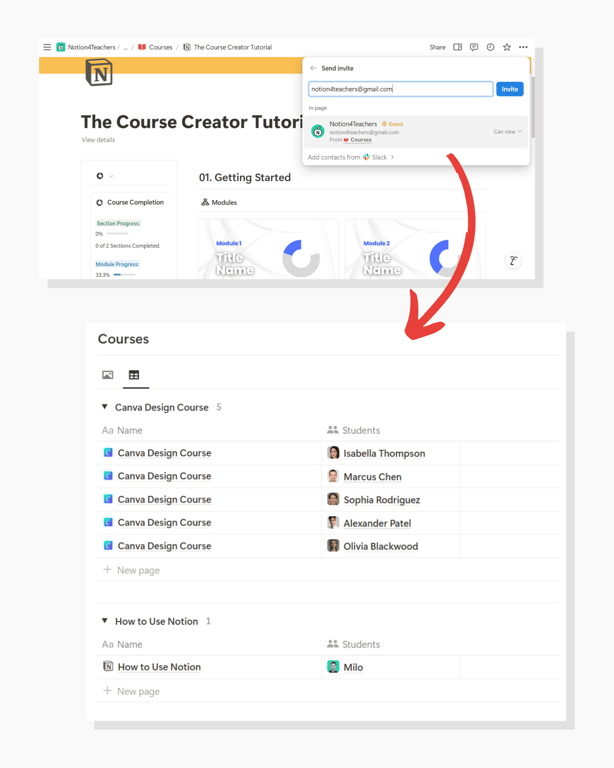
- Click on the
New CourseButton
- Select your new Course Template
- Note: You will create a course like this for each student.
- Share your course with a single student by inviting them via email through the Notion Share button
- Allow your student to have edit rights.
- This will allow them to use checkboxes and track their progress.
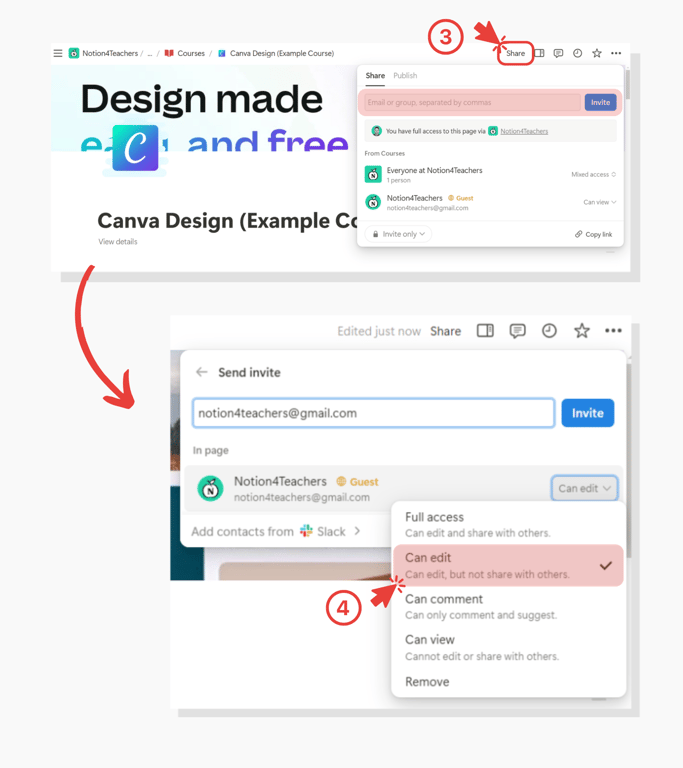
Important: By giving this one student full edit rights, they could accidentally delete lesson material. However, since you first created the course as a template, and only gave them edit rights to this one instance, they can only affect their version of the course. Your other courses and base template will be unaffected 👍.
- Lastly, back on the Course Creator page, set the course’s student property to the student’s guest profile you invited earlier. This helps you know which person has permissions to view which course.
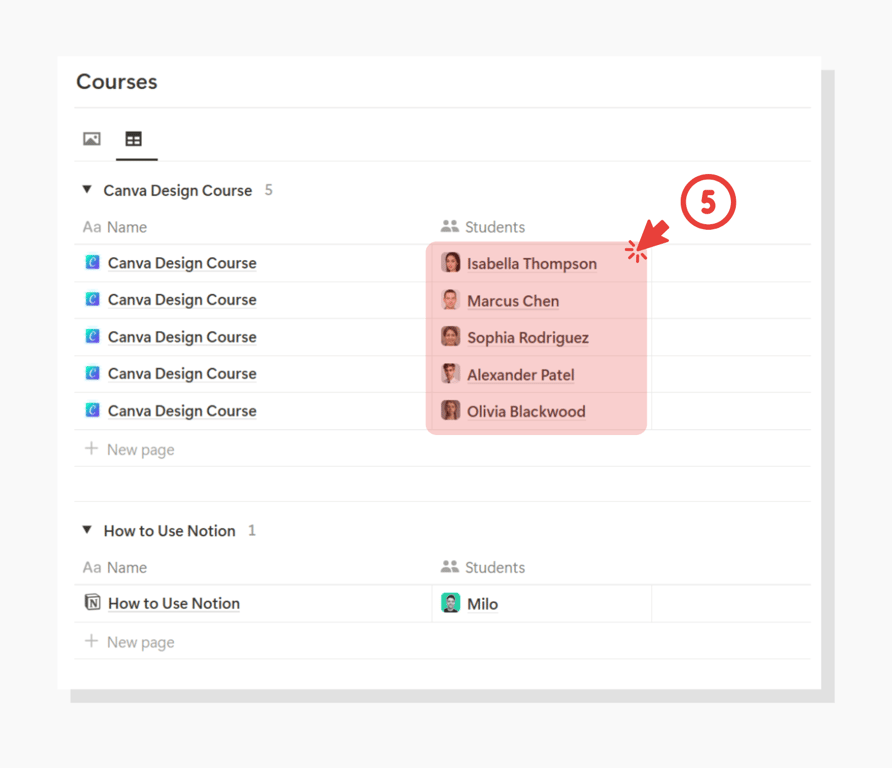
Note: Every student will have their own version of the course. Whenever you want to invite another student to take your course, create another version of the course as instructed above.
Note: If you need to update the course, update the base Course Template.
Tracking Student Progression
After being invited to the course with edit rights, students can mark lessons as complete using the completion checkbox.
There are a few ways to do this:
- Click the
Complete Lessonbutton at the bottom of a lesson page.
- Click the checkbox at the top of the lesson page.
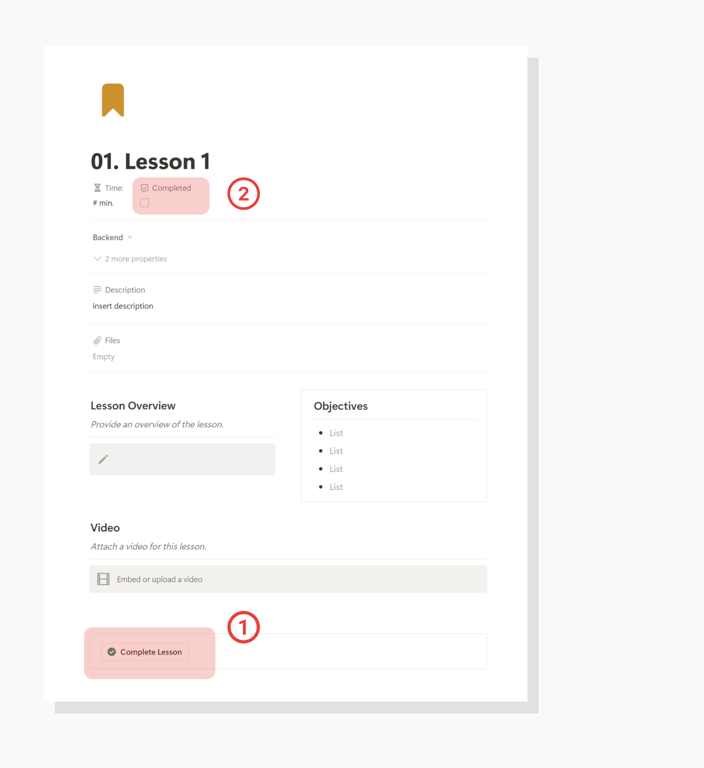
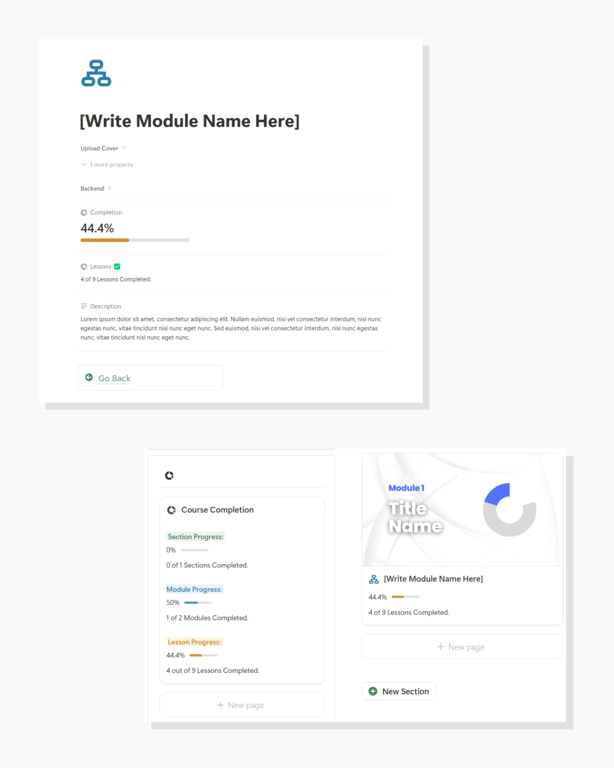
Students (and yourself) can then view their lesson progress on the module pages or the home page with various progression bars.
That’s all there is to it.
Happy course creating!
Frequently Asked Questions (FAQ)
Do I need to pay for Notion to use the Course Creator?
The Course Creator template requires a one-time purchase fee, and after that, it's yours to use forever. You can use it completely with Notion's free plan - no paid Notion subscription is needed. This makes it a cost-effective alternative to expensive platforms like Kajabi or Teachable, which can cost $60 or more per month.
How many students can I add to my course?
You can add unlimited students to your course. Each student gets their own version of the course, allowing them to track their progress individually without affecting other students' experiences.
What if I need to update course content after sharing it with students?
Updates should be made to your base Course Template. However, these changes won't automatically appear in already-distributed courses. For major updates, you may want to create new course instances for your students.
Can students interact with each other within the course?
The basic template doesn't include built-in student interaction features. However, you can add discussion sections or integrate external communication tools like Discord or Slack for student interaction.
What types of content can I include in my lessons?
You can include various content types:
- Text and written instructions
- Embedded videos (YouTube, Vimeo, etc.)
- Downloadable files and resources
- External links
- Images and diagrams
- Embedded audio files
- Checkboxes for task completion
Is there a limit to how many sections, modules, or lessons I can create?
No, there's no limit to the number of course components you can create. However, we recommend keeping your course structure clear and manageable for optimal student experience.
What happens if a student accidentally deletes content?
Since each student gets their own version of the course, any accidental deletions only affect their instance. Your master template and other students' courses remain unaffected.
Can I customize the look and feel of my course?
Yes, you can customize your course by:
- Adding custom cover images to sections, modules, and lessons
- Modifying the color scheme
- Adjusting the layout within lessons
- Adding your own branding elements
How do I track student progress?
Students can mark lessons as complete using checkboxes, and progress bars automatically update to show completion rates. You can view individual student progress through their course instance.
Can I sell my courses created with this template?
Yes, you can sell courses created with this template. However, you'll need to handle payments and course access management separately through your preferred payment processor and distribution method.