Menu
Where are you coming from?What is a handstand?The Handstand PuzzleThe Handstand EquationAlignment 101: The 1st StackPriming the 1st stackYour starting pointWarm-up, prehab and typical training weekYour priorities 🎯
Where are you coming from?
As you will soon discover, the way I teach is very hands-on.
The more I see your handstands, and know about you, the better I can orient you. That’s why this program isn’t a one size-fits-all method, and a template I could sell without getting involved.
I will soon have a look at the most important of them all: Your First Homework, in Module 1.
As you submit it, please let me know here a bit more about what you have done in the past regarding handstands.
You wouldn’t believe how helpful it is for me - I see patterns, and it allows me to improve your course accordingly!
What is a handstand?
If you have Googled "handstands" before, you probably have found a plethora of advice about what it should and shouldn't be.
Paradoxically, the overwhelming amount of cues and techniques you can now find online makes the beginner's journey slower, if anything.
In our method, handstands are not about doing "the right cues".
InfoWarningTip
There is no one recipe, one box in which we would fit all bodies.
Some people are tall, others are shorter. Some experience fear, others seem to be devoid of it. Some will progress fast, others will take more time consolidating the foundations. Some will be strong or tight, others will be flexible or not so endurant.
After 10 years in the process, I realised that people make much more progress when we work at figuring their handstand, rather than the handstand.
figure your handstand, rather than “the” handstand.
The goal of my courses is to give each participant the knowledge required to master any handstand shape they want to tackle in the future.
By bringing things down to their basic mechanical reality, my hope is to simplify your journey and streamline it.
From the wall to the middle of the room
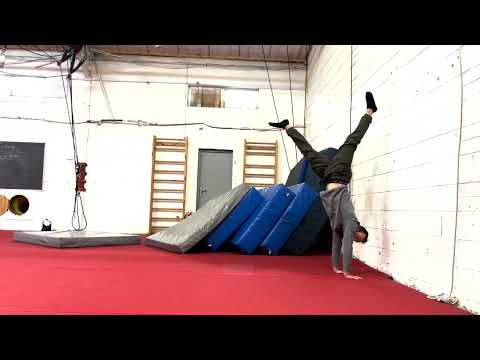
Handstands are practiced with the wall.
The wall provides you with the time to think, feel and adjust all the different components you will need to automate specific motor patterns. Those are a prerequisite to your freestanding (that is, in the middle of the room) handstands. Take the analogy of swimming 🏊♂️
The wall is the armbands you learn to swim with. It holds you safe as you figure out what to do with your little legs. Eventually, it will just be there for mental aid, but you will have figured out the technique, and will be ready to move on to open waters. As simple as this may sounds, the following is extremely important: In wall practice, you have one and only goal: to make yourself lighter against the wall.
Mapping out the space around you
To start making sense of what happens when we're upside down, we need a common frame of references.
We will call forward whatever our fingers point towards.
Therefore, backwards is the opposite direction, where the base of your hands, or "heels", point.
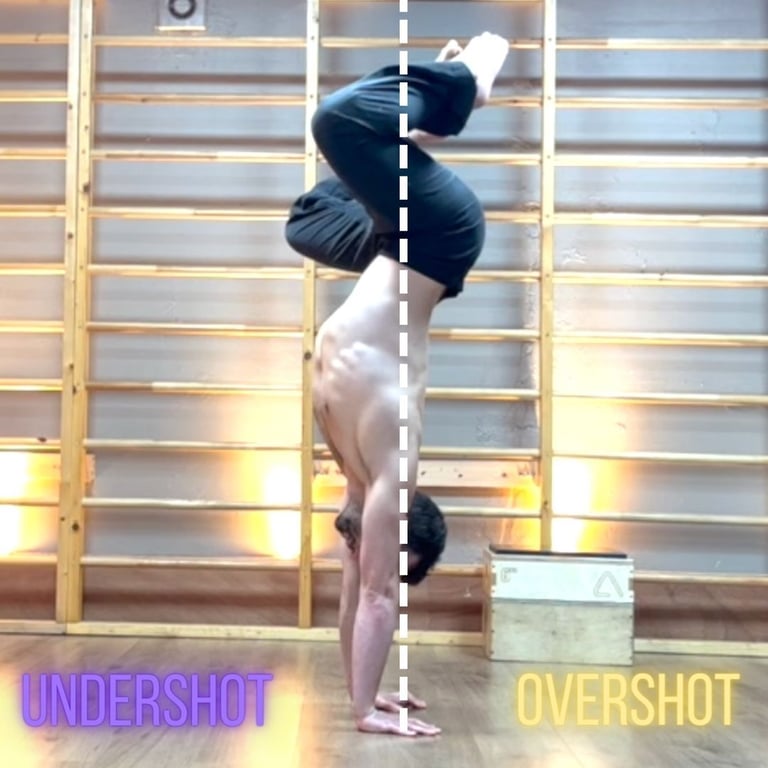
Furthermore, we want to draw a vertical line from the centre of our hands up to the ceiling.
Anything past that line will be called overshot, or overbalanced.
Anything before that will be called undershot, or underbalanced.
The Handstand Puzzle
Like any other skill, handstand is the sum of its parts. Tennis isn’t tennis. 🎾 It’s right hand, left hand, service, endurance, mental toughness and so much more.
Well, handstands aren’t handstands. I like to explain the different pillars that make a handstands as the piece of a big puzzle 🧩
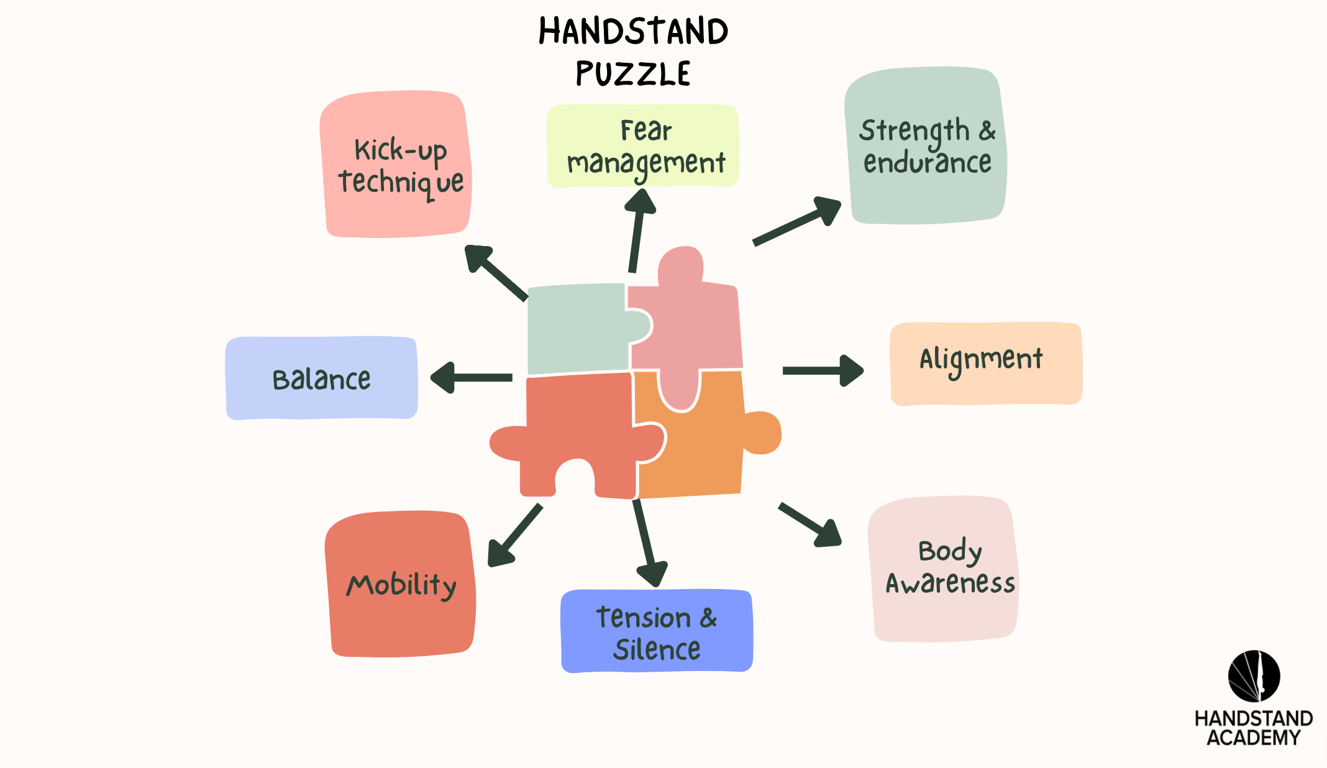
Kick-up technique: quite obviously, the way we get into a handstand we can hold is by kicking up. There are different ways to kick-up (hands down, lunging, straddling up, pressing up, etc.).
Working on your kick-up technique consists in improving how well you land against the wall. This is assessed by two metrics: consistency and softness. You should strive to develop a kick-up so well tuned that it can consistently land softly against the wall.
Working on your kick-up technique consists in improving how well you land against the wall. This is assessed by two metrics: consistency and softness. You should strive to develop a kick-up so well tuned that it can consistently land softly against the wall.
If it does, it is the mark that not only you can get your ass up there, but in a way that will allow you to freestand tomorrow.
Strength and endurance 💪
If you can’t hold a tennis racket more than 15 minutes, chances are training your tennis game is going to be hard.
Similarly, while handstands aren’t about strength, and while people tend to over obsess about their need for it (if I had received 1 euro every time I heard people telling me their core was weak, I’d buy myself a nice condo in the South of France), having a base layer of strength is required.
Furthermore, having a bit more than that won’t do any harm, because:
- being strong allows you to work longer without the quality of your performances dropping too early in your sessions, and
- strength allows you to compensate for technical mistakes in many handstand scenarios.
In saying that, to continue with the tennis 🎾 analogy, you can bench press all you want - that will not make you a good tennis player.
Tension and silence🤫
Picture a little toddler trying to stand up straight. See how big their movements are, and how that ends up toppling them over. With time, they become a bit more stable. Their body movements are smaller, more controlled. They fall less. Till they stand up straight.
Balance is easier achieved when nothing is moving.
When you walk your feet on the tight rope, every single motion of your body needs to be under control, and any parasite movement, like a surprise sneeze, is likely to make you fall.
Your body sneezes a lot upside down 🤧
Let’s say you performed a great kick-up and ended up in a functional alignment. You may be able to balance this! You catch the balance for two seconds, start to feel stable. I just need to keep doing the same.
But suddenly, without even realising it (cf, Body awareness), you hinge at the hips and relax your fingers. The end.
Your body is noisy, and with the best balancing skills in the world, this will always precipitate the end of your handstand.
Interestingly, if you tense your body, locking specific key joints at their end range of motion, you close the door to many of those parasitic movements.
For instance, it is quite common to see beginners kick-up with slightly bent legs. Those not fully extended knees put you at the mercy of a sudden extension of the leg that will make you fall.
On the contrary, having both legs nice and straight early in your kick-up takes care of that risk altogether. Those joints are locked and don’t need your precious attention anymore.
Locking ourselves this way using tension is however unnatural. It is energy consuming and inefficient. We need to teach ourselves to access this degree of tension, to reach more stillness in our handstand.
Fear management 😨
The elephant in the room.
Fear is what takes everything you have been diligently working on with the wall for the last six months and throws it out the window.
There is no freestanding handstand without having dealt with your fear of falling.
We do not practice our way to a perfect handstand that will always keep you away from harm’s way.
We practice falling forward, failing in a safe way so that no matter how bad things get, you have the absolute certainty that you will find the floor safely.
Only at that price will your brain allow you to put to good use the skills you have refined for all the other pieces of the puzzle and see something manifest freestanding.
Fear has two components:
- learning to bail (Exit mechanisms), and
- learning to be more comfortable in more and more compromised position
Alignment: Alignment is the position of your body. There is a lot of confusion out there about what is a RIGHT alignment, and usually it rhymes with how pretty or straight your line is. This is nonsense, there are plenty of alignments, some of them quite advanced, that are perfectly crooked and perfectly fine.
That’s why I ditched the concepts of WRONG and RIGHT and instead use the words Functional and Dysfunctional.
A Functional alignment is one that you can balance without the wall one day.
You can not balance a dysfunctional alignment freestanding (unless we’re talking about press strength, but more on this later).
But you can find hundreds of dysfunctional handstands with the wall.
That’s why the wall is a double-edged sword ⚔️.
You can literally waste your time against it without even realising it, rehearsing dysfunctional alignments that do not exist freestanding.
Body awareness 🧘🏾
Body awareness is the forgotten child of handstands. However, if you have ever been upside down, you should have noticed how hard it is to orient yourself in space and to isolate every single body part without the rest moving.
Handstands are a work of isolation. Think about those robot dancers you have seen videos of. Their isolation skills are excellent, and they have rehearsed countless hours the movement of specific body parts without any movement from the rest.
This is what you should aspire to perform in handstand. When you’re about to fall and the only thing you need to save your balance is to, say, flex the right elbow… if you do that, but also bend the left knee, dorsiflex your feet and change your gaze, what could have been saved will invariably fail.
Pro tip: body awareness is best practiced without trying to achieve any balance.
Mobility
Mobility (the lack thereof) can be a restricting factor in handstands. The three main areas where it may play against you are:
→ the elbows (biceps). If you can not fully lock your elbows, those will always have a bit of give, and a tendency to sneeze easily. Like any other bent joint, only this one is weight bearing to top it all. Just realise that you may experience a bit more movemen than average through your elbows flexing and extending.
→ the shoulders. The one area that everyone obsesses over. When we can not bring our arms overhead at a 180 degree angle (shoulder flexion) with the torso, we call those closed shoulders. When we can, we have open shoulders. People feel cursed when they have closed shoulders because they quickly realise that they need open shoulders to achieve the instagram line of their dreams. Worse, some teachers lead them to believe they need open shoulders to achieve a handstands.
Utter bullshit.
Closed and open shoulder handstands both exist. The only difference is: when you have open shoulders, you can work on both, when you don’t, you can only work on the closed shouder forms.
→ the hamstrings. To a lesser degree, super tight hamstrings may get in your way when you kick-up against the wall. That is pretty easy to fix: we just need to design a kick-up that works for you.
All in all, the quest for mobility should be, at best, a side gig. The hour you spend stretching (hopefully with a fair idea of what you should work on, how and why) is an hour taken way from learning to stand on your hands with the cards you already have.
In my experience, people tend put too much expectations on their mobility improving, as if this was the missing piece of their puzzle. In 99% of the cases, it isn’t. But your mobility or lack thereof will definitely influence the alignments you will work on.
Balance ⚖️
When you have a good kick-up, a functional line, and the strength, endurance, body silence and body awareness required to make this happen consistently, you’re ready to experience balance.
Balance happens mainly through the fingers. As you can see, it is one of the last pieces you put down into your puzzle.
It is however the one that obsesses every beginner, when it doesn’t derserve your attention until you have solidly laid out the other pillars.
Balancing should be learnt with the wall first, where you can carefully adjust the variables and ensure that all the pieces of the puzzle are in the right order and of good enough standards.
When you take it freestanding, you have to add: fear
The Handstand Equation
Handstands are a complicated skill that gets overly complex by the amount of contradicting opinions and cues available out there.
My work over the last decade has been to simplify and streamline it all to make handstands as approachable as possible.
Every time I zoomed out, I realised how dogmatic handstands have become:
People achieved handstands. Think their way is the only way, and then go on to spread their gospel.
Instead, I have worked to figure out the rules that govern all handstands, that apply to everyone. As much as possible, I have tried to step away from the dogma - although this per se is one way to see handbalancing.
We will have plenty of time to get into the subtleties of handstands week by week, month by month, and, if you get hooked like I have, year by year.
For now, we want a couple of simple, clear models we can rely on.
To cut through the noise.
This gives me the reassurance that, whether we work together for a couple of weeks or several years, you leave with the best framework I have found to date to decipher any handstand shape you want to master in the future.
The first framework is the Handstand Equation, which is a selection of the most important components of the handstand Puzzle.
Handbalancing = an efficient kick-up + a viable alignment + timely rebalancing - fear
Contrary to a popular belief amongst beginners, handstands aren’t just about balance.
There is no balance if you don’t have a body position - we call them shapes or alignments - that can be balanced.
And regardless of how good that alignment is, if your kick-up doesn’t allow you to stop in it, you will never be able to balance.
Alignment 101: The 1st Stack
In establishing the 101 of handstands, we start with the foundation of the castle, without which everything crumbles: the first stack.
The first stack is the position of the shoulders over the hands. While most people come with the preconceived idea that the arms should be perpendicular to the wall, they actually should be slightly past that vertical line, over the centre of the hands, or the first knuckles.
As we start learning our first drills C2W (chest to wall) and B2W (back to wall), pay attention to your first stack.
Priming the 1st stack
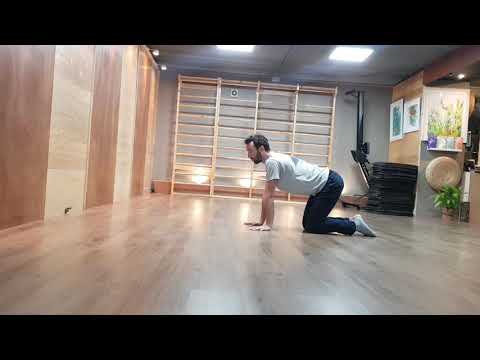
Quite simply:
What isn’t understood on all 4 won’t be done against the wall. What isn’t nailed on the wall will hardly exist reliably without it.
Unsurprisingly, in terms of complexity:
Freestanding > Wall drill > Floor drill
The more you can ingrain motor patterns and sensations on all 4 and with the wall, and the easier your life will be tomorrow: you won’t be surprised by anything, as all the pieces of the puzzle will have been covered.
The first stack is the foundation of your handstand. Without it, not handstand.
Make sure you revisit where it is every.single.time you warm-up.
Your starting point
The starting line isn’t the same for everyone.
In this method, we will roughly separate people in 4 levels.
Kick-up, push the floor away, use your shoulders, tuck your ribs in, tilt your pelvis, engage your core, activate your glutes, grab with your fingers…
While the internet is flocked with drills and tutorials about handstands, this buffet of information usually fails at grouping them by level, context and scenario. Not knowing where to start, one usually ends up with an indigestion.
But just as you would expect a professional athlete to train differently from a Sunday hobbyist runner, so should you start rethinking your handstand training.
Let’s say you run a weekly 5k on your weekends, and you suddenly decide to sign up to the Paris Marathon tomorrow: you would be guaranteed an injury or trauma of some nature.
You are just not ready to raise the bar so high. Anyone in their right mind, without being a professional sports scientist, would gradually train for longer distances across the span of several months to be ready for that big day.
Same logic in handstand.
You need to adapt your training regimen (volume, frequency, types of drill and focal point) to your current capacities.
I like to distinguish four levels in handstands. Knowing where you are on the journey will allow you to pick the techniques and concepts most relevant to you.
Complete Beginner: if you try to kick-up against a wall, you can not land and stay against that wall yet.
Beginner: you can kick-up against the wall, but have little notion of alignment or balance. You haven’t started practicing in the middle of the room yet.
Improver: you are actively working on divorcing the wall.
Intermediate: you have reached the Freestanding Freedom Standard, and can freestand in the middle of the room, and can work on more advanced variations such as shape shifting, press handstands and one arm.
Warm-up, prehab and typical training week
Doing hand circles in the air for 5 minutes is a warm-up.
Working on wrist mobility and the strength of hand and forearm muscles for 10 - 25 minutes qualifies as prehabilitation - a neologism based on the term “rehabilitation” and referring to the work needed to prevent the injury.
You need both.
Prehab can be performed at the beginning of your sessions (especially in your first months of practice), as well as on some rest days, without any attempt at handbalancing, especially if you experience soreness.
Monday | Tuesday | Wednesday | Thursday | Friday | Saturday | Sunday |
training | rest | training | active rest | rest | training | rest |
ㅤ | ㅤ | ㅤ | prehab | ㅤ | ㅤ | prehab |
same drill, different volume. In handstands, the good news is that most of your warm-up drills and prehab exercises overlap. During a warm-up, we usually perform each drill once, for 6 - 12 reps. To prehab, you can simply select a couple of warm-up drills, and perform 10 - 20 reps of each, for 2 - 4 series.
Your priorities 🎯
Now that we have some understanding of what this journey is about, we want to clarify our short-terms pursuits. This should have been done in details in your review, but here is a memo:
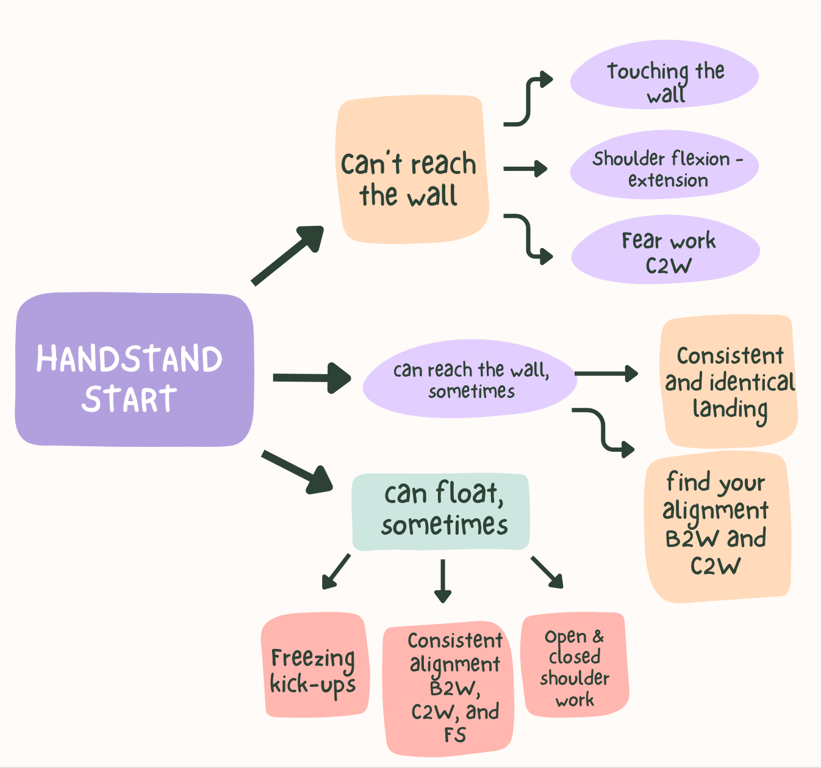
If you can’t reach the wall yet, your mission in the next few weeks months will be to learn to land on the wall at some point.
This is one of the most frustrating parts of handstands so you gotta give yourself time AND expose yourself frequently to inversions.
The more you can do practice in between sessions together, the better.
Your priorities will be:
→ kick-up-wise, to touch the wall more and more consistently.
→ alignment wise, to understand the GDBD drill, the role of shoulder flexion in stacking and the impact of fear on alignment.
→ balance-wise, you shouldn’t be too worried yet.
If you can reach the wall but your kick-up isn’t perfectly consistent, soft or/and systematic, your priorities will be:
→ Kick-up wise, to find a boring, identical, replicable kick-up
→ Alignment-wise, to find your alignment, your recipe, that maximises your success rate in the different assessments we do. Where are your shoulders, how closed or open are they, where is your pelvis, where are your legs.
→ Balance-wise, to learn finger pushing and pingponging.
If you can float sometimes, your priorities are
→ To freeze systematically in your kick-ups.
→ To have a congruent alignment B2W, C2W and FS. Meaning, to have conquered fear quite well.
→ To be able to achieve - or even begin to travel from and into - closed shoulders and open shoulders alignments.
→ to perform more advanced forms of finger pushing
 Made with Bullet